Posts

Showing posts from 2015

How to do Facebook Login with Custom Button Android

In my previous Facebook Post( http://androidammy.blogspot.in/2015/07/facebooklogin1.html ). I write how to use Facebook default button to login with Facebook. In this blog I am writing about how we can use facebook login functionality from android widget like Button/TextView/ImageView. All the steps are same as last facebook login post. This blog describe that  how to create instance of CallBackManager and LoginManager and how to call Login from click listener. 1.  Create Instance of LoginManager and CallbackManager. com . facebook . login . LoginManager fbLoginManager ; fbLoginManager = com . facebook . login . LoginManager . getInstance (); CallbackManager callbackManager = CallbackManager . Factory . create (); mFbLoginManager . registerCallback ( callbackManager , new FacebookCallback < LoginResult >() { @Override public void onSuccess ( LoginResult loginResult ) { // here write code
Easy way to convert Json to Pojo/Model class of Java

Is It hard for you to create Pojo/Model/Bean classes according to Json result specially when you are using third party libraries like GSON/Jackson? There is very easy and fast way to create Pojo/Beans/Model classes for Json Schema.  Check out the below link to convert your Json response to Java model classes.   http://www.jsonschema2pojo.org/ For Example I want to convert  json data to Gson Pojo class then following are the points to do it. 1. Copy and paste Json to TestEditor displayed in link. 2. Enter my package name and class name. 3. Select Source type to Json. 4. Select annotation style to GSON. Its done here.  Preview the Class structure and copy paste to your model class. Happy Coding :D

How to change the color of Hamburger icon in Toolbar Android

Image
Hello friends,  This tutorial is for changing Hamburger color on toolbar.  The default colors of Hamburger Navigation icon is white and black but we can change the color of hamburger icon.  Create a new style in style.xml. I created with name of drawerIcon. extends style by “Widget.AppCompat.DrawerArrowToggle”. <style name= "DrawerIcon" parent= "Widget.AppCompat.DrawerArrowToggle" > </style>          3. Add item color with given color code which color you want for hamburger. <style name= "DrawerIcon" parent= "Widget.AppCompat.DrawerArrowToggle" > <item name= "color" > @color/color_icon </item> </style>     4. Go to your main theme class. I have “AppTheme”.     5. Add your drawer theme to main theme with name of “drawerArrowStyle”. <style name= "AppTheme" parent= "Theme.AppCompat.Light.DarkActionBar" >

Facebook Login Using LoginButton

Image
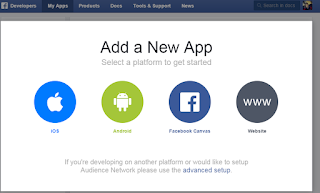
Facebook SDK give two classes in Android to Login through Facebook 1. LoginButton class which provides UI of Login button and maintain the Login and Logout session. 2. LoginManager class which provides initiate login without using UI element. In This tutorial we will use LoginButton class. Below Step by Step process to Facebook Login using LoginButton.  1. Open Facebook Developer Account . 2. Go to MyApps and click on Add new app then the below pop-up window opened. 3. Select Android from above popup. The below window opened.  4. Type your app name (App name must not be contain word 'face' in it) and press skip quick start button. The below window opened. 5. Open Android Studio and create a project. 6. Now open app level gradle and add the below dependency. compile ' com . facebook . android : facebook - android - sdk: 4.4 . 0 ' 7. Open xml file and Add LoginButton into xml like below. <com.facebook.login.widget.LoginButton

Floating Label in EditText Material Design Android

Image
Hello Friends, This tutorial is about Floating Label (Like OLX android App) in Material design. Before Material design When user Tap on EditText then hint of editText was gone. But with the help of TextInputLayout   hint text will move to top of EditText . First of all create new project in Android Studio. 1. After creating project open build.gradle(Module:app). 2. Add appCompact-v7 and design dependencies in build.gradle. dependencies { compile fileTree ( dir: ' libs ' , include: [ ' *. jar ' ]) compile ' com . android . support : appcompat - v7: 22.2 . 0 ' compile ' com . android . support : design: 22.2 . 0 ' } 3. Add EditText within TextInputLayout . < android . support . design . widget . TextInputLayout android: layout_width = "match_parent" android: layout_height = "wrap_content" > < EditText android: layout_width = "match_parent&qu

Accelerometer (Shake Events) Example with Service Android.

Hello Friends, This tutorial is about get shake event when you are not in Application or any specific activity. With the help of Service we can get Shake Event out of activity. First of We will create class which extends Service and Implements SensorEventListener. 1. Class  MyService.java import android.app.Notification ; import android.app.NotificationManager ; import android.app.PendingIntent ; import android.app.Service ; import android.content.Context ; import android.content.Intent ; import android.hardware.Sensor ; import android.hardware.SensorEvent ; import android.hardware.SensorEventListener ; import android.hardware.SensorManager ; import android.os.Handler ; import android.os.IBinder ; import android.support.v4.app.NotificationCompat ; import com.ammy.shakeevent.R ; public class MyService extends Service implements SensorEventListener { private SensorManager mSensorManager ; private Sensor mAccelerometer ; private

Display Option menu(Overflow icon) icon in ActionBar in devices like Samsung S4 & Xolo.

Image
In android when we are dealing with Option menu then the worst part is that in some devices the option menu Button is invisible from action-bar like ( Samsung , XOLO devices). This is because Mobile devices has a hardware button for option menu. to solve this issue There is one tricky approach. 1. Create Class file in your application which extends Application class. 2. Override onCreate() of Application class. 3. write below code of under onCreate() try { ViewConfiguration config = ViewConfiguration . get ( this ); Field menuKeyField = ViewConfiguration . class . getDeclaredField ( "sHasPermanentMenuKey" ); if ( menuKeyField != null ) { menuKeyField . setAccessible ( true ); menuKeyField . setBoolean ( config , false ); } } catch ( Exception ex ) { ex . printStackTrace (); } 4.